Core Parts Documentation
This page explains all the CORE Multiboard Parts. For most situations, you'll only need core parts.
In the Advanced Knowledge Hub, you can learn about the other Multiboard parts, which are intended for experienced users with niche use cases.
Poster
For an interactive and more in-depth learning experience, check out the Learning Packs.
(More images for the text below will be coming soon)
Measurement System
Unit Types:
- MU (Multi Unit): Based on 25 mm sizing (Most Multiboard parts)
- CU (Cell Unit): Based on 50 mm sizing (Most Multibin Parts)
- Conversion: 2x2 MU = 1x1 CU
Dimension Order:
- Width (front) x Depth (side) x Height
Multiboard
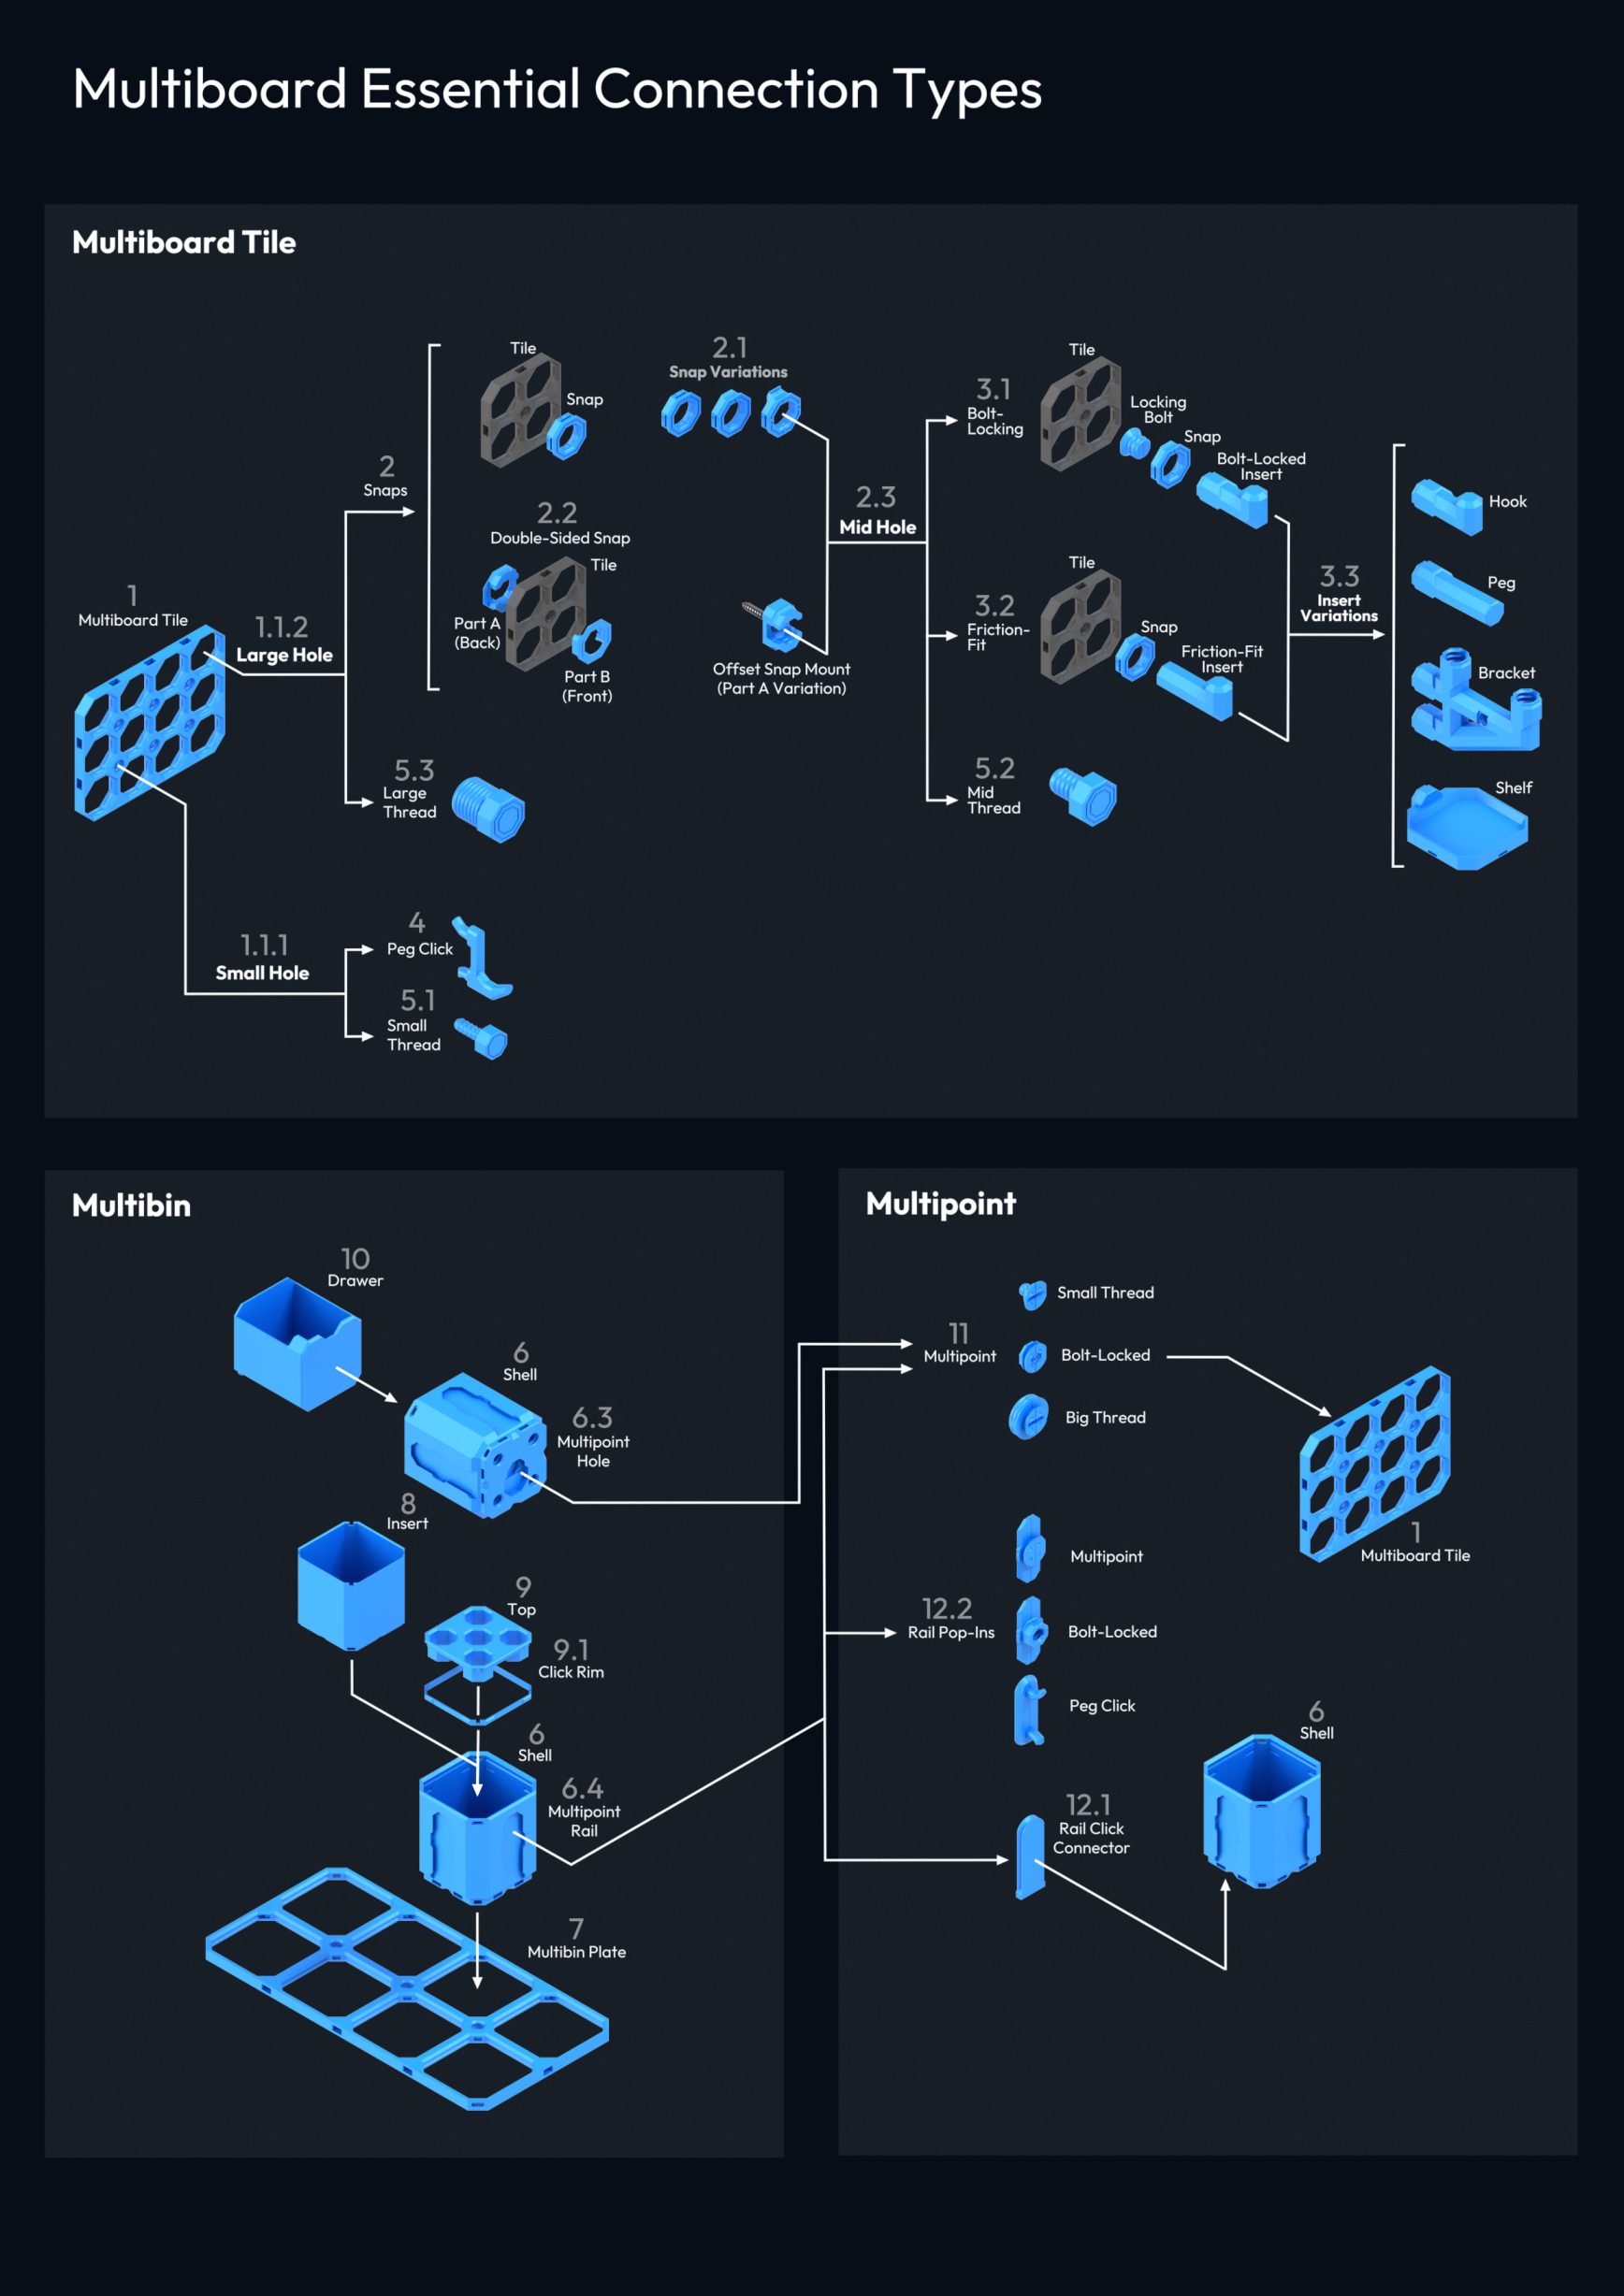
1. Multiboard Tile
Multiboard Tiles are multi-use boards that are based on a 25 mm grid (MU). All holes on the Tiles are threaded and are compatible with a wide range of connection types.
1.1 Hole Types
- 1.1.1 Small Holes: Compatible with Peg Click Hooks, Small Threads, and non-3D-printed pegboard accessories.
- 1.1.2 Large Holes (Multiholes): Compatible with Snaps and Large Threads.
1.2 Tile Set Up and Mounting
- The tile arrangement and mounting is explained in the Tile Mounting Guide page.
- There is also a free Tile Planner that calculates all the Tiles and Mounting Parts you’ll need.
1.3 Printing Info
-
Tiles can also be stack printed to save time. Check out the Printing Guidelines for more info.
-
Printing Stats (8x8 Tile Example):
- Print Time: 3h 16m (Bambu Lab X1C)
- Material Use: 80.55g
- Material Cost: $1.6 (Bambu PLA Basic)
2. Snaps
Snaps “snap” into the Large Holes of the Multiboard Tiles and have a Mid Hole for attaching accessories.
2.1 Snap variations:
- Regular: Clicks into place and is completely symmetrical.
- Moderate Weight Bearing: Holds a lot of weight in ONE direction. This is the most commonly used Snap. They must be inserted at an angle.
- Heavy Weight Bearing: Holds more weight than Moderate Snaps, but they only work with Tiles that are offset from wall. They also hold weight in one direction and must be inserted at an angle.
2.2 Double-Sided Snaps (DS Snaps):
DS Snaps have two parts that snap together on opposite sides of the Multiboard Tiles.
DS Snaps are useful for:
- Creating Tiles that are mounted onto a surface that are removable.
- Freestanding Tiles that require structural support on both sides of the tile, or will have accessories on both sides.
Two Parts:
-
Part A: Usually goes at the back of the Tiles. There can be different variations of Part A:
- Offset Snap Mounts (DS Part A): They create a 6.25 mm offset from the surface and have a screw hole for mounting it to a wall. Learn more in the Tile Mounting Guide.
-
Part B: Usually goes at the front of the Tiles.
2.3 Mid Hole
Most Snaps have a Mid Hole for attaching accessories. A Mid Hole can take 3 connection accessories:
3. Bolt-Locked and Friction-Fit Inserts
These are the two primary methods of attaching accessories to Multiboard Tiles using Snaps:
3.1 Bolt-Locking
Method of strongly securing an accessory to a Multiboard Tile.
-
Set Up: Bolt-Locked Insert > Moderate Snap > Locking Bolt Tile
- The "Locking Bolt" locks the Insert to the Snap, so the insert cannot be pulled out.
-
Variations: Hooks, Pegs, Shelves, Brackets.
3.2 Friction-Fit
Can be easily pulled in and out and don’t require a Locking Bolt. They are great for light-weight accessories like hooks and pegs.
- Set Up: Friction-Fit Insert > Moderate Snap > Tile
- Variations: Hooks, Pegs
3.3 Insert Variations
-
Hooks:
- Hook > Heavy or Moderate Snap > Locking Bolt > Tile
-
Pegs:
- Peg > Heavy or Moderate Snap > Locking Bolt > Tile
-
Shelves:
- Shelf > Heavy or Moderate Snap > Locking Bolt > Tile
-
Brackets:
- Top Bracket Insert > Heavy or Moderate Snap > Locking Bolt > Tile
- Bottom Bracket Insert > Regular Snap > Locking Bolt > Tile
4. Peg Click
Connects to two Small Holes on the Multiboard Tiles, just like a pegboard accessory.
- Peg Click Hook: Easiest way of attaching a hook to a tile.
5. Threads
Threads are great for attaching any remix accessory to the Multiboard Tiles by simply adding a hole into the accessory.
5.1 Small Thread
- Screws into Small Holes, found on the Multiboard Tiles.
5.2 Mid Thread
- Screws into Mid Holes, found on the Snaps.
5.3 Large Thread
- Screws into Large Holes (Multi Holes), found on the Multiboard Tiles.
Multibin
6. Shell
6.1 What are Shells?
- Multibin Shells are modular containers designed for maximum connection options.
- Multibin Shells can be paired with Multibin Tops or Inserts to adapt them to different needs.
6.2 Dimensions
- The dimensions are based on Cell Units. 1CU = 50 mm.
- Stacking a 1 CU high Shell on another Shell will increase its height by 50 mm (1 CU).
- The Multipoint Holes on the Bin Base are directed towards the width (front) of the Bin.
6.3 Base
-
The Bin Base can be placed on Multibin Plates.
- If the Multibin Plate is vertical, Bar Clips can be used to hold the Bin in place.
-
The Base can connect to a Multipoint, which can connect to a Multiboard Tile to create a Drawer.
6.4 Multipoint Rail Wall
-
Multipoint Rails are located on the side walls of the Shells.
-
Main purpose:
- Attaching bins to other bins
- Attaching the bin to the Multiboard Tile.
-
Compatible Connectors:
- Multipoint: Bin to Tile
- Rail Click Connector: Bin to Bin
- Rail Pop-In: Bin to Bin, or Bin to Tile
6.5 More Functions
- Additionally, Multibin Shells can be stacked, extended, divided, and work with magnets. Learn more in the Advanced Knowledge Hub.
7. Multibin Plates
-
Place Multibin Shells on these Plates.
-
Plates can be connected together using "Dual Clips".
-
Plates can be mounted vertically:
- "Bar Clips" can be used to hold the Bin Shell in place.
- There are also various Plate Snaps that can be attached to the Multibin Plate.
-
Base Plates: Base Plates are like Multibin Plates, but have a base with connection holes that can be attached to a bracket and to the Multiboard Tiles.
8. Inserts
Inserts are placed inside of Multibin Shells to add more functionality.
9. Tops
Tops add more functionality to a Multibin Shell and attach using Top Click Rims. They can also click onto Multibin Insert Bins.
9.1 Top Click Rims
Top Click Rims are used to attach Tops to Multibin Shells.
10. Simple Drawers
- Simple Drawers are inserted into Multibin Shells.
- Prevent the Drawers from falling out using "Drawer Stopper Pins".
- Use Multipoints to attach the Shells to Multiboard Tiles.
Multipoint
Multipoint is a connection system for easily connecting different parts together. It also serves as a bridge between Multibin Parts and Multiboard Tiles.
11. Multipoint
-
Multipoints allow for a "slide-on" installation and removal of an accessory part while still being strong.
-
Multipoints attach to accessories that have a Multipoint Hole or a Multipoint Rail (Negative).
-
Multipoints can be connect to a Multiboard Tile through different methods:
- Threads: Small, Mid, Large
- Bolt-Locking
12. Bin connections
12.1 Rail Click Connector
- A simple way of connecting a Shell to another Shell.
- It slides onto the Shell Rail Walls and clicks into place.
12.2 Rail Pop-ins
-
"Rail Pop-Ins" securely attach to the Shell Rail Walls by unfolding and "popping" in to place. Pop-Ins lock in securely and do not slide on and off.
-
Pop-Ins can add a connection type to a Multibin Shell, like:
- A Multipoint or Rail
- A Peg Click
- A Bolt-Locked Insert